프로젝트에서 구현하려고 하는 부분
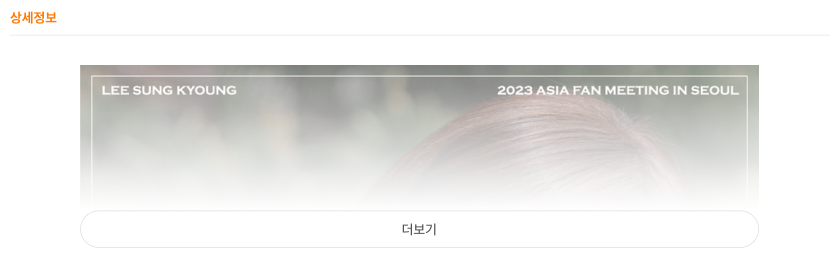
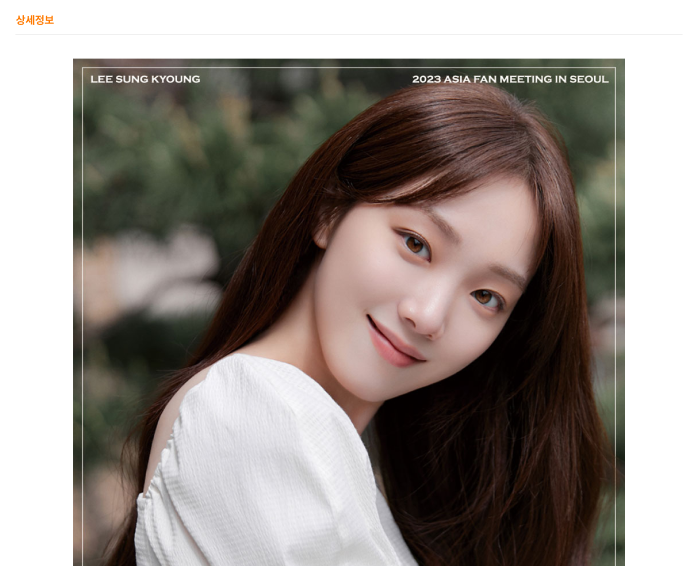
- 상세정보에서 더보기 버튼을 눌렀을 때 사진이 크게 보이도록 구현
- 버튼을 누르지 않았을 때에는 그라데이션으로 표현되도록 & 사진 밑에가 보이지 않도록
기능구현 코드
  const [isMoreView, setIsMoreView] = useState(false); /* 더보기&접기 상태 저장 */

  const onClickImageMoreViewButton = () => {
    setIsMoreView(!isMoreView);
  }; /* 클릭시 상태 반전 */

  const DetailsContent = () => {
    return (
      <ContentsWrap isMoreView={isMoreView}>
      <ImageMoreWrap  isMoreView={isMoreView}>
        {isMoreView === false && (
            <WhiteGradientOverlay /> /* 버튼을 누르지 않았을 때만, 그라데이션 추가  */
          )}
        <img src={image43} alt="Your Image" />
        </ImageMoreWrap>
        {isMoreView === false && ( /* 버튼을 누르지 않았을 때만 버튼이 보이도록 */
        <PlusButton onClick={onClickImageMoreViewButton}>더보기</PlusButton>
      )}
      </ContentsWrap>
    );
  };
- isMoreView라는 state를 만들어서 더보기를 눌렀는지 안눌렀는지의 상태를 저장
- onClickImageMoreViewButton 함수로 버튼을 클릭했을 때 isMoreView 상태를 바꾸도록 구현
- 버튼과 그라데이션은 isMoreView가 false일 때 (버튼을 누르지 않았을 때)만 보이도록 함
- 각 컴포넌트에 props로 isMoreView를 전달
스타일
const ContentsWrap = styled.div`
  margin-top: 50px;
  display: flex;
  flex-wrap: wrap;
  justify-content: center;
`

const ImageMoreWrap = styled.div`
  position: relative;
  max-height: ${(props) => (props.isMoreView ? "" : "195px")}; /* isMoreView 상태가 true일 때는 높이 제한 없이, false일 때는 195px로 작게 보이도록 */
  overflow: hidden;
`;

const WhiteGradientOverlay = styled.div`
  position: absolute;
  top: 0;
  left: 0;
  width: 100%;
  height: 100%;
  background: linear-gradient(rgba(255, 255, 255, 0) 0%, /* 그라데이션 설정 */
      rgb(255, 255, 255) 90%);
`;

const PlusButton = styled.div`
  display: flex;
  width: 910px;
  padding: 14px 0px;
  justify-content: center;
  align-items: center;
  border-radius: 25px;
  border: 1px solid var(--festie-gray-300, #DFDFDF);
  background: #FFF;
  cursor: pointer;
`
완성된 모습

'개발공부 > REACT' 카테고리의 다른 글
| [React] 리뷰 - 별점 기능 만들기 (1) | 2024.01.28 |
|---|---|
| [React] API의 정의, 장/단점, API 사용하기 _ JSON, fetch 함수 (1) | 2023.11.25 |
| [React] 간단한 갤러리 기능, 이미지 미리보기 만들기 (1) | 2023.08.09 |
| [React] react-calendar 라이브러리로 캘린더 만들기 (3) | 2023.08.02 |
| List, Key를 이용해 출석부 출력하기 실습 [처음 만난 리액트 #29] (3) | 2023.02.19 |


